Halloween Decorations
Halloween decorations you can
make or buy for
the spookiest night.
Halloween Recipes
Our
cookbook filled with Halloween recipes, tasty tricks and treats.
Halloween Games Spooky Halloween games adaptable for both kid's and adults.
Halloween
Party
Halloween Party planning and
ideas
for your festivities.
Halloween
Safety
Safety
information, tips and suggestions for a safe Halloween.
101 Halloween Tips
That's right, 101 great
Halloween tips, ideas and suggestions!
Halloween Props
Spooky Special Effects and Props for
your Halloween haunt.
Pumpkin Carving
Pumpkin carving tips
for carving your Halloween Jack O' Lanterns.
Movies & Music
Suggestions for the best Halloween music and Halloween movies.
Halloween Crafts
Halloween craft ideas and instructions for lots of
Halloween fun.
High-Tech Halloween
Ghostly gadgets for your computer, cell-phone, Palm Pilot and
more!
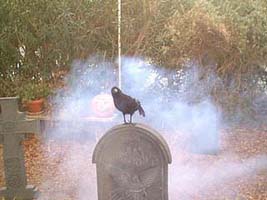
HALLOWEEN TOMBSTONES
Buying
and/or making your Halloween tombstones is only
the first step in creating the ultimate atmosphere for your yard
haunt or haunted graveyard. But there are many more things you
can do to add realism and heighten the effect
your tombstones and graveyard will have on your visitors on Halloween night.
The placement and securing of the tombstones is very
important, both for appearance and to keep them from falling
over. We like to keep our cemetery looking old and foreboding. Use as
many different styles of tombstones as you can and place them
unevenly throughout your graveyard. Be sure to set some of them
crooked or misaligned to give it that unkempt look.
Try to use a
larger amount of classic style tombstones with some
elaborate ones mixed in. We mixed one extra fancy tombstone
in with every three classic style tombstones, so as not to
over do it.
Halloween
Tombstone Tips
A collection of tombstone related tips and tricks we
have used over the years to enhance there appearance.
Store Bought Tombstones
Suggestions and reviews of some of the best commercially
made Halloween tombstones on the market.
Basic Homemade Tombstones
How to make your own
Halloween tombstones from sheets of common foam
insulation.
Advanced Homemade Tombstones
Coming soon -
Instructions for making a higher-end tombstone using Dow
foam board.


 Buying
and/or making your Halloween tombstones is only
the first step in creating the ultimate atmosphere for your yard
haunt or haunted graveyard. But there are many more things you
can do to add realism and heighten the effect
your tombstones and graveyard will have on your visitors on Halloween night.
Buying
and/or making your Halloween tombstones is only
the first step in creating the ultimate atmosphere for your yard
haunt or haunted graveyard. But there are many more things you
can do to add realism and heighten the effect
your tombstones and graveyard will have on your visitors on Halloween night.