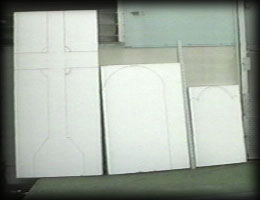
EPITAPHS &
DESIGNS
"What do you want on your
Tombstone?"
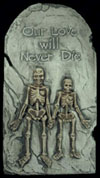
Imprinting the epitaphs and decorative
designs onto your tombstones can be accomplished several ways.
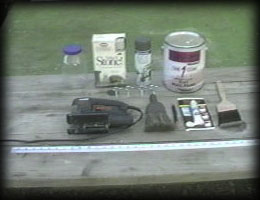
Method #1 - The simplest way is to use
standard craft acrylic paint and brushes to paint on an epitaph and any other designs you
want onto the face of the painted tombstone. Stencils can make this easier, but the
lettering will be flat on the surface of the tombstone.
Method #2 - After the tombstone has
been primed and has dried completely, you can write your epitaph with a slightly darker
colored marker or pencil. Now use an Xacto knife to carve out the letters in a
"V" shape. Finally, to make the epitaphs more
readable, we use acrylic craft paint to shade the inside of the letters. Black is too dark
and the color of the primer is too light, so mix a color in-between.
Method #3 - For the most realistic
look you can carve the epitaph and any decorative patterns into the foam with a high speed
rotary tool (Dremel). Carving the letters into the surface of the tombstone looks very
realistic, but does require more time and a few extra tools. Several different attachments
are used including the wheel grinder, router and small cutting wheel. This can be done freehand or by printing out the epitaphs on paper, then
attaching the paper to the face of the tombstone. You then use the rotary tool to carve
right through the paper into the foam. Care must be taken or the spinning
tool will dig too deep into the foam or go off the lines of the design. Finally, to
make the epitaphs more readable, we use acrylic craft paint to shade the inside of the
letters. Black is to dark and the color of the primer is to light, so mix a color
in-between.
Always wear safety
equipment, including safety goggles when working with power tools
Method #4 - You can also use a soldering or
wood-burning iron to burn-in the words and designs. But you must do this before priming
the foam.
DISTRESSING AND
FINAL PAINTING
While the gray primer has brought the foam
closer to looking like a tombstone, it still does not look like stone. Since we like our
tombstones to look as realistic as possible, we
apply a special finishing paints to give it a stone like look.
"Style Stone" spray kits are
available from craft and hardware stores, and produce very nice speckle patterns similar
to those of granite. While this can be a bit expensive to use, the effect is worth it.
And you can use these year after year.
Don't try to hold down the spray button for
long periods of time to paint the tombstone. Instead, use short, controlled bursts. This
way if you over paint an area you can easily fix it by blending around it.
Also, if you will be using the tombstones
outdoors for an extended period of time or during bad weather, you will want to
weather-proof the tombstones by adding a final coat of clear, non-gloss sealant.
|
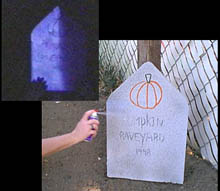
Black Light Hair Spray
from Fun World sprayed evenly over the front surface of the
tombstone shows up very spooky under the black light. We found that spraying the
tombstone in
the dark with the black light on works the best.
 One can of the Black Light Hair Spray can usually
paint between 3 and 5 tombstones depending on their size. This product can be found just
about everywhere during the Halloween season. One can of the Black Light Hair Spray can usually
paint between 3 and 5 tombstones depending on their size. This product can be found just
about everywhere during the Halloween season. |
X |
 |
SECURING THE
TOMBSTONES
We have used several different methods to
secure our tombstones to the ground that work very well.
Method #1 - First carefully drill a
3/8" hole into the bottom of the tombstone a couple of inches from each end. Now take
two 16" pieces of 3/8" dowel (sharpened at both ends) and carefully drive one
end half way up into the bottom of the Tombstone. Lightly set the tombstone with it's
spikes onto the ground to make an impression of where the spike holes will go. Using an
extra sharpened dowel, drive it eight inches into the ground where your spike
markings are, and remove. You can now push the tombstone spikes into the holes.
Method #2 - At most hardware stores you can
buy large spikes (they look like giant nails). Measure and cut a piece of
1/2"x6" board so that it is four inches longer than the width of the tombstone.
Drill a centered hole four to six inches from each end one bit size smaller than the
diameter of the spike. Hammer the two spikes through the holes. Set the bottom of the
tombstone over the top of the spikes just hard enough to make indentations for drilling.
Drill the two spike holes into the tombstone. Apply white glue (Elmers) to the spikes and
inside of the spike holes, and push the spikes into the tombstone holes all the way. To
setup, dig a trench the same size as the wooden based and it into it. Cover the base with
dirt just above the edge of the tombstone.
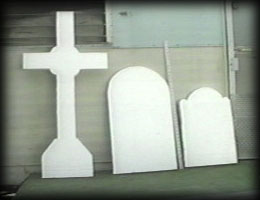
We like our cemetery to look old and
foreboding. We use many different styles of tombstones, painted in different stone colors,
and place then unevenly throughout our yard haunt. Some are crooked or misaligned. As
final touches, you can lightly dust them, add mud, glue on fake moss, leaves, spray with
cob-webs, etc. If you have a supply of dirt, you can build up 3" to 6" high
mounds in front of each Tombstone to give that "just buried" effect. |