|
|
|
|
HALLOWEEN
PROPS & SPECIAL FX |
|
THE
PHANTASM SENTINEL
article by
Jordan Avon
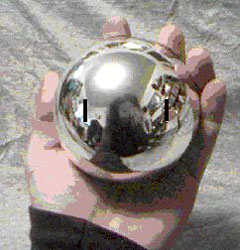
 First of all, you need to acquire
the type of spherical Christmas ornament that I typically use for these creations. They
are hemispherical (the two halves snap together) chromed plastic ornaments, produced by a
company called Westrim, in Chatsworth Ca., and are only sold through Arts & Crafts
outlets like the Michael's chain of stores, or Beverly's Crafts (another chain). They are
usually only ordered into these stores near November, near the Yuletide season, so one has
to be patient in obtaining them. The product name they are sold under is "Crystal
Keepsakes", and come in silver, gold, and other tones. First of all, you need to acquire
the type of spherical Christmas ornament that I typically use for these creations. They
are hemispherical (the two halves snap together) chromed plastic ornaments, produced by a
company called Westrim, in Chatsworth Ca., and are only sold through Arts & Crafts
outlets like the Michael's chain of stores, or Beverly's Crafts (another chain). They are
usually only ordered into these stores near November, near the Yuletide season, so one has
to be patient in obtaining them. The product name they are sold under is "Crystal
Keepsakes", and come in silver, gold, and other tones.
Once you have obtained your sphere ornament (we will assume
it is the silver one, for our purposes here), you will also need to acquire some strips of
what is called "friendly plastic". These are pieces of a rubbery plastic, that
is plated on one side, and are typically about 1 1/4" wide, and around 3 1/2 ->
4" long. You will need two of these per sphere. In addition, you will need an Xacto
knife, an intense heat source, such as a butane piezo torch (a lighter will work, but it's
tougher to use), a can of chrome spray enamel, a large size silver wood screw, a pair of
wire cutters, a pair of pliers, a medium-sized sewing needle, a scribe or large nail, and
some model glue. So, to sum up, the materials needed are:
- (1) Westrim "Crystal Keepsakes"
chromed plastic Christmas ornament
- (2) pieces of "friendly plastic",
with silver chrome on one side, available through most craft stores.
- (1) Xacto knife, which you will use in making
your "incisions" to the plastic sphere.
- (1) piezo torch, or other means of heating
your Xacto blade (and other tools) to a red-hot state.
- (1) can of silver chrome spray enamel
- (1) large silver wood screw (about 3/4"
long)
- (1) Scribe or large nail
- (1) A medium size sewing needle
- (1) Pair of wire cutters
- (1) Pair of pliers
- (1) Tube of Testor's or equivalent model glue
 After you have your materials together, first remove the ornament
hanging tabs from each sphere half, by snipping them off with a sturdy pair of wire
cutters. Make sure the cutter's blades are lying parallel to the base of the tab, for a
nice clean removal. After you have your materials together, first remove the ornament
hanging tabs from each sphere half, by snipping them off with a sturdy pair of wire
cutters. Make sure the cutter's blades are lying parallel to the base of the tab, for a
nice clean removal.
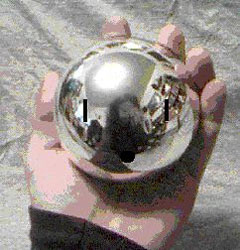
Now take one sphere half, and face the convex
portion toward you with one hand, and with the other hand, Xacto-scratch two small lines,
about two inches apart, where the blade "incisions" will go. This is fairly
easy, as your own face's reflection will be visible in the sphere half, making it easier
to estimate where the marks should go.
 Make these marks no longer than you intend the base of your
blades to be (the stem of each blade, not the forked part). Also, make a small
"X" scratch between, and slightly below the center, of where the blades will be
mounted, as that is where your "drill bit" screw will be emerging later. Make these marks no longer than you intend the base of your
blades to be (the stem of each blade, not the forked part). Also, make a small
"X" scratch between, and slightly below the center, of where the blades will be
mounted, as that is where your "drill bit" screw will be emerging later.
After your scoring of the sphere is finished,
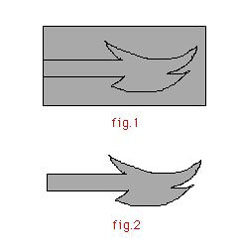
put the sphere aside, and move on to the making of the blades. To do this, take one piece
of the "friendly plastic", and on the chromed side, draw with pen the shape of
the entire Sentinel blade, making sure that the stem part is no wider that the lines you
made on your sphere. Try to make the stem part a little longer than what you normally see
in the films, as you must make sure you have enough stem reaching into the sphere to hold
them securely, when you mount them later.
 Cut out the blade with scissors, and then place the blade you
just cut out on top of the other strip of "friendly plastic". Use a pen to trace
the shape of the other blade, and then use scissors to cut out the other blade. Place both
blade pieces, with chrome side down, on a piece of newspaper, and evenly spray them (the
un-chromed sides of the blades) with the silver chrome enamel paint. Cut out the blade with scissors, and then place the blade you
just cut out on top of the other strip of "friendly plastic". Use a pen to trace
the shape of the other blade, and then use scissors to cut out the other blade. Place both
blade pieces, with chrome side down, on a piece of newspaper, and evenly spray them (the
un-chromed sides of the blades) with the silver chrome enamel paint.
The idea here is not to match the chrome of
the other side, because spray enamel chrome paint simply can't do that, but to at least
come fairly close, and make sure the spray-painted sides of the blades are facing inside,
with the original "friendly plastic" chrome sides on the more visible outside,
when you finally mount them on the sphere.
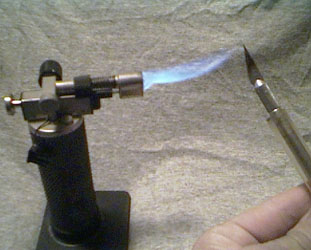 Now take your Xacto blade, and heat it to a red-hot state, and
quickly use the heated blade to open up the areas you scratched earlier, to accommodate
the stem of the blades you made. Now take your Xacto blade, and heat it to a red-hot state, and
quickly use the heated blade to open up the areas you scratched earlier, to accommodate
the stem of the blades you made.
Take care, as you only want the slits large
enough to just barely fit the blade stems...if they are made too large, they will not hold
the blades properly, and they will droop downward. Move the hot blade sideways slightly,
to widen the slit to just barely fit the blade stem into it.
You will likely have to re-heat your blade
several times, as the metal and plastic cools quickly.
 Don't worry if there is a little excess "welling" of
plastic around the edges of your slits, as this can be snapped off fairly easily with
fingernails, and touched up with a little of the chrome paint with a small paint brush
later on. Now, using your scribe or large nail, heat it using the same technique as used
with the Xacto blade. If your scribe or nail is long (about 6 or 7 inches) you may be able
to hold the tool directly, as you did with the Xacto blade, but if you are in doubt, use
pliers or similar to hold the scribe before you heat and use it. Using this heated tool,
melt a hole just big enough to fit the shaft of your chosen silver wood screw through, at
the location you scratched earlier, between and below where the blades will be mounted. If
your hole is too small, heat the scribe again, and move it evenly around the edge of the
hole, to gently enlarge it to the size you need. Don't worry if there is a little excess "welling" of
plastic around the edges of your slits, as this can be snapped off fairly easily with
fingernails, and touched up with a little of the chrome paint with a small paint brush
later on. Now, using your scribe or large nail, heat it using the same technique as used
with the Xacto blade. If your scribe or nail is long (about 6 or 7 inches) you may be able
to hold the tool directly, as you did with the Xacto blade, but if you are in doubt, use
pliers or similar to hold the scribe before you heat and use it. Using this heated tool,
melt a hole just big enough to fit the shaft of your chosen silver wood screw through, at
the location you scratched earlier, between and below where the blades will be mounted. If
your hole is too small, heat the scribe again, and move it evenly around the edge of the
hole, to gently enlarge it to the size you need.
While you are making these openings, test fit
each blade and the screw, but never force it, as these ornaments are very fragile, and
easy to crack if handled improperly. One more hole can be made (if you desire to hang the
sphere), by heating the medium sized sewing needle (holding with pliers is definitely
advised here!), to a red-hot state, and melt a small hole near, but not on the edge, and
slightly behind, where the two halves snap together. Don't put the hole on the seam, as
the plastic will warp, and you may not be able to snap the halves together. This will
allow you to knot a piece of fishing line, and push it up through this hole, to hang your
sphere.
Now, you are ready for final assembly.
Position your blades in through the slits in your sphere, allowing about 1/8" to come
inside. Seal with model glue the area around the stem (inside the sphere only, no glue
outside) of both blades, making sure they are protruding evenly with one another. Now
position your silver wood screw, pushing it out through its own hole, all the way to the
screw head. Seal the edge of the screw head (if needed) with glue, although this is not
always needed, if the fit is snug enough through the hole. Let this half of the sphere sit
overnight, for the glue to dry. The next day, gently snap the two halves together, and you
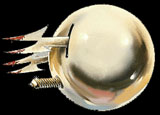
have your own Phantasm Silver Sentinel replica!
Thanks to Jordan Avon of the Sphere Factory
for providing us with these great instructions that show how to build a replica of the
classic silver "Sentinel" sphere from the Phantasm films.
|
|


