|
These are great for the Hispanic festival Día de los Muertos
or Day of the Dead. It's a Mexican holiday, celebrated in
Mexico, on November 1st and 2nd. It is done in connection
with the Catholic holidays of All Saints' Day (November 1)
and All Souls' Day (November 2), two holidays that
originally sprouted from Samhain (Sow-Wain), the Pagan
Celtic festival held for New Year, when the Catholic church
was trying to convert the Pagans to Christianity. Traditions connected with
the holiday include building private altars honoring the
deceased using sugar skulls, marigolds, and the favorite
foods and beverages of the departed and visiting graves with
these as gifts.
Our county
now has high Hispanic population and, as with other
traditions like Halloween which was brought here by the
Irish, "Día de los Muertos" is being celebrated here, too.
Usually in small family groups or neighborhood parties,
Mexican Americans will make these sugar skull and brightly
decorate them, not for eating but for decoration.
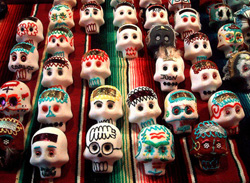
The
decorations for Día de los Muertos are very colorful and
full of skulls, skeletons and lots of sweets. We've seen
some of the most beautifully decorated sugar skulls at a
friends in Los Angeles, California when we went for his
party. It's a nice way to honor the dead and a beautiful way
to extend our Halloween spirit!
!!!THESE SUGAR SKULLS ARE FOR DECORATIVE
PURPOSES ONLY!!!
!!!THEY ARE NOT TO BE EATEN!!
What You'll Need To
Make Sugar Skulls:
Ingredients:
Clear Plastic
Skull Molds -
6" x 6" for large skulls. 3" x 4" for medium and mini skulls
Granulated sugar
Powdered sugar
Meringue powder
(Ateco or other gourmet brand)
IMPORTANT INFO!!
The
right Meringue Powder is very important!! Don't use the same
kind of meringue powder that you would use for icing to make
the sugar skulls!! The type that you'll find in cake supply
and craft shops has usually been cut with inert ingredients
that make it suitable for use making icing only. It's not
good for use with heavy granulated sugar because it
will cause your skulls to crumble and not hold together
properly. Look for a gourmet brand like "Ateco Brand
Meringue Powder", which can be found at gourmet stores
online and off.
Utensils
Needed:
Large metal bowl
Measuring spoons
1 cup liquid measuring cup
1/4 cup dry measuring cup
1 teaspoon measuring spoon
Plastic spray bottle (to keep mixture moist, if needed)
Electric mixer (for making Royal Icing)
Plastic cups (for mixing icing colors)
Toothpicks or Craft Sticks (for mixing paste food color into
icing)
6" x 6" coated cardboard squares (to dry skulls on)
Disposable
Pastry Bags & Tips
Quart Sized Zip Top Bags (to use in place of pastry bags)
Paper towels
Making White Sugar Skulls
This is kind of a "mix to
make" recipe.
You'll need to use 1 teaspoon of Meringue
Powder for every 1 cup of sugar that you use. You'll use 1
teaspoon of water for every 1 cup of sugar used. So, let's
start with a 5 pound bag of sugar batch. This should make 5
large skulls or 20 small skulls.
1 - 5lb
bag of Sugar
1/4 cup of Meringue
Powder
10 teaspoons of Water
First, mix
the sugar and meringue powder together well. You can do this
by using a large spoon or by hand. You can also use a hand
mixer but doing it by hand gives you a better feel of the
mixture.
When this
mixture is blended thoroughly, start adding the water a
teaspoon at a time and mix in with hands. When all the water
is mixed in, it should have the consistency of thick, wet
sand and should hold together when squeezed in the hand.
Pack sugar
mixture into molds, making sure to keep kneading the mixture
often as the water will try to settle to the bottom of the
mixture, making it dry. You want it to hold together in your
hand as you press it into the mold, if it doesn't then the
mix is too dry and you'll either need to knead it again to
distribute the water or add a few drops of water at a time
until it's just wet enough.. Make sure that you firmly press
into molds, you can use a spoon for extra pressure.
Pay special attention
to any indentations in the mold, like eyes, chin or designs.
The tighter you pack it, the more detailed it will be and
the better it will hold together. Use a straight edge of
some kind to scrape over the back of the mold to flatten it.
Immediately
invert onto a 6"x 6"cardboard square and remove the mold by
lifting it up. If a skull crumbles, it's too dry. If it
doesn't come out easily, it's too wet. You can throw any
ruined skulls back in to the mixture, knead some more and
use it again.
Let the
finished skulls sit for at least 10 hours, preferably over
night, to dry.
For
Decorating:
Royal Icing
Royal icing is a smooth,
hard-drying icing that's perfect for decorating sugar skulls. It
is durable and will last much longer than most
icing.
Ingredients:
3 Tablespoons Wilton Meringue Powder
4 cups confectioners' sugar (about 1lb.)
6 Tablespoons warm water
Paste Food Coloring in bright shades
Beat all
ingredients until icing forms peaks (7-10 minutes at low
speed with a heavy-duty mixer, 10-12 minutes at high speed
with a hand-held mixer). This will make 3 cups of icing. For stiffer icing, use 1 tablespoon less
water. Use paste food coloring, mix in the icing color of your choice.
For Sugar Skulls, use the brightest colors that you can
find.
ANOTHER IMPORTANT TIP:
If you are making the large sized two piece skulls,
with a separate front and back you'll have to
hollow each side out before you "glue" them together with
Royal Icing. Use a metal spoon and scrape the inside down to
about a 1" wall inside after they dry. Check these skulls
after 6 hours to see if they are dry enough to handle but
not completely dry. It makes scooping them out easer if they
are still a bit damp. Don't scoop out the neck area because
this is it's base and you'll want it thick. After you scoop
them out, let them finish drying and then use a pastry bag
filled with white royal icing as glue, running a thick line
around the walls and sticking them together. Clean off any
icing that may squeeze out the sides. Set the skull aside to
let the icing dry, about 3 hours.
When all the skulls are dry, mix the royal icing, color and
use disposable pastry bags and tips or quart sized zip bags
with a small corner cut off to decorate. You can also add
sequins, glitter, flowers, fake gems and just about anything
else you'd like to decorate them. Remember,
THESE ARE NOT EDIBLE!
We know the
whole things sounds like a daunting task but once you've
made them a couple times, you really get the feel for it and
can know if the mixture is correctly mixed, wet and dry
enough, etc. just by feel. If you pack them carefully, they
can be used for a few years before they start to fall apart
and then you can just make new ones! Store in a cardboard
box, not plastic, because they have to be able to "breathe"
while in storage.
Check out our recipe for creating
Skull Cakes, too!
|


