|
|
|
Build it and they will come!
|
You spent days turning your
front yard in to a haunted place of dread with lights, cob webs, fog and as icing on the
Halloween cake you've built a complete graveyard. The night finally arrives and to your disappointment you only get a
few trick or treaters, and only those because they were lost.
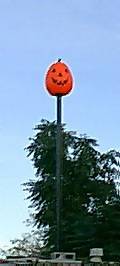
Well, our Halloween Beacon might be just want
you need! Like the Holy Grail of Halloween, our beacon can be seen for hundreds of yards
and is immediately recognizable by trick or treaters as the symbol of Halloween. Its easy to build and even if you get plenty
of trick or treaters this great decoration looks really cool! |
  |
Before buying any materials, you
need to know the distance between where the beacon will be placed and the nearest
electrical outlet. We tied a string to a brick and placed it on our roof where the beacon
would be.
|
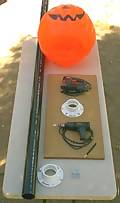 |
Materials
List
1 - Large blow-mold plastic pumpkin
1 - 3"x10' SCH 40 ABS pipe
2 - Closet flanges - 3" id
4 - 5/16"x1-1/2" screws
4 - 5/16"x1-1/2" bolts
4 - 5/16" hex nuts
4 - 5/16 washers
1 - 2'x3'x7/8" piece of particle board
1 - Extension cord (outdoor rated)
1 - Can of flat black spray paint |
|
|
Then we
un-spooled the string until we reached the outlet. The
string measured 16 feet. Add ten feet (the length of the
pipe) and subtract the length of the cord that came with the
pumpkin. 16 feet + 10 feet - 4 feet = 22 feet. So
we bought the closest to this length, a 25 foot extension cord.
Pre-assembly notes
- The plastic pumpkin we used was bought many years ago, at a Target store, and measures
31" tall by 21" at its widest point. While we have seen the same design lately,
we haven't seen one quite this large. This effect will not work with foam pumpkins because
they are solid and won't allow light to shine through the walls of the pumpkin. We chose
ABS pipe because it is more rigid than PVC. The size of the base board is only a
recommendation. Just make sure its big enough to act as a stable base for the almost
thirteen foot tall beacon.
|
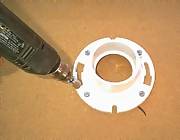
Wash the two closet flanges and ABS pipe
with soap and water to remove any oils that might prevent the paint from sticking
and allow to
dry. Using a socket wrench or drill with the right size socket attached, connect one of
the closet flanges to the center of the base board using the four 1/4"x2"
screws. This section is called the base assembly. You can now spray paint the pipe, base
assembly including the attached flange, and the second closet flange with flat black
paint. Don't paint the inside of the flanges or it may make it difficult to insert the
pipe into it later. Allow the paint to dry thoroughly before proceeding. |
 |
|
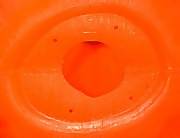
Since the hole in the bottom of our pumpkin
wasn't large enough to put a hand through, which we needed to do to attach the washers and
nuts to the bolts, we had to make a larger hole. Draw a 3" diameter circle in the
center of the bottom of the pumpkin and then use a jig saw or utility knife to cut the
circle out. Now, center the flange over the hole you cut and mark the position of the four
bolt holes on the bottom of the pumpkin. Using the marks as guides, drill the four
1/4" holes through the bottom of the pumpkin with a drill. |
 |
|
Place the closet flange over the large hole
you cut in the bottom of the plastic pumpkin and line up the four bolt holes in the flange
with the four holes you drilled in the bottom of the pumpkin. Push the bolts through the
closet flange holes and the holes in the bottom of the plastic pumpkin. Now, reach in
through the large hole and place a washer over each bolt, then put a nut on each bolt and
tighten snugly with a wrench. Do not over tighten or you might break the plastic. |
 |
|
Using a 1-1/2" spade bit (measure the
widest point of the male end of the extension cord for the correct size), drill a hole
through the side of the pipe about three inches from the bottom of the pipe. This will be
the exit point for the male end the extension cord. Attach the female plug of the
extension cord to the male plug on the cord attached to the light in the plastic pumpkin
and tie it so it won't slip loose. |
 |
|
Run the cord(s) all the way through the ABS
pipe and pull the plug out through the hole you drilled in its side. Don't pull on it to
hard or you may pull it from the light receptacle, or separate the two cords. Push the ABS
pipe all the way into the closet flange on the plastic pumpkin, but don't connect the pipe
to the base flange yet. Take the light post and base assemblies up to the roof and lift
the light post assembly up so you can push the end of the pipe into the closet flange
attached to the base assembly. |
 |
|
Run the power cord to the
electrical outlet you choose earlier, making sure that its safe, secure and will not be a
hazard. Place a sandbag, cinder block or other heavy item on top of the wooden base, one
on either side of the pipe for added stability.
If you have a peaked roof you will need to
make some sort of sturdy table that will sit over the peak for the base assembly to sit
on. Watch for an update on how to build one.
At 200 yards the pumpkin and its face are clearly visible. At 300
yards the face could still be seen, but not as clearly and at 400 yards the face vanishes,
but the pumpkin shape is still very visible.
As with any electrical device, care must be
taken to protect against electrocution or it becoming a fire danger. Make sure that the
cord is hidden from view and not where it can be tripped over or snagged on.
Do not use
this prop if it is raining, windy or other extreme weather conditions exist or you risk an
electrical hazard that could cause a fire.
|
 |
If you anticipate any wind that may push the
beacon over, you may want to add guide wires between the corners of the base and the
center of the pipe, similar to what you see on radio towers, using braided wire and large
metal eyelet's.
Other Ideas:
Next year we're going to make two more of these to set
on either side of our front yard gates.
|
|


