|
|
|
|
CARVING PUMPKINS
PATTERNS |
|
 Selecting
a Pumpkin Carving Design Selecting
a Pumpkin Carving Design
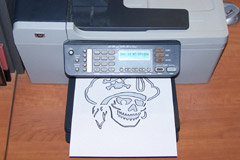
There is an awesome selection of pumpkin carving
patterns, stencils and ready to use designs available on many sites
online, both for free and for purchase. There are literally
hundreds of unique designs, with new ones appearing every
year.
Selecting Pumpkins for Pumpkin Carving
Designs
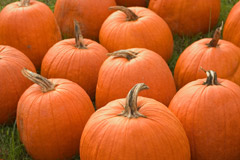 Selecting the pumpkins you'll
carve for your Halloween Jack-O'-Lantern is very important, particularly
if you will be using a pumpkin stencil. You'll need to pick pumpkins
according to the type of pumpkin pattern you intend to carve on them. Select
pumpkins that are uniformly
orange meaning that are ripe, have no bruises, cuts or nicks. Be sure to select a pumpkin that is large enough and as close to the same shape as the
pumpkin pattern you're going to carve. It should be as smooth as possible, and free of scratches,
dents or gouges. Selecting the pumpkins you'll
carve for your Halloween Jack-O'-Lantern is very important, particularly
if you will be using a pumpkin stencil. You'll need to pick pumpkins
according to the type of pumpkin pattern you intend to carve on them. Select
pumpkins that are uniformly
orange meaning that are ripe, have no bruises, cuts or nicks. Be sure to select a pumpkin that is large enough and as close to the same shape as the
pumpkin pattern you're going to carve. It should be as smooth as possible, and free of scratches,
dents or gouges.
Tools
for Pumpkin Carving Designs
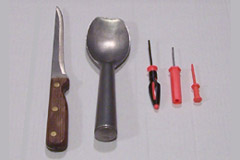 Pumpkin carving saws are essential for carving fine, detailed areas, but can be used for the entire
Jack-O-Lantern.
A pumpkin carving transfer
tool is used to transfer the pattern onto the face of the pumpkin.
A pair of scissors to cut out the pumpkin carving design. We use several different types and sizes of spoons for removing the seeds, pulp
and skin from the inside of the pumpkin. An ice-cream scoop and a large metal ladle work
great to scrap the inside of the pumpkin to remove the guts. Utensils like the ones on the right are inexpensive
and can be found at most department stores in their kitchen section. We've picked some up
at our local dollar store for much less than other stores carry them. Pumpkin carving saws are essential for carving fine, detailed areas, but can be used for the entire
Jack-O-Lantern.
A pumpkin carving transfer
tool is used to transfer the pattern onto the face of the pumpkin.
A pair of scissors to cut out the pumpkin carving design. We use several different types and sizes of spoons for removing the seeds, pulp
and skin from the inside of the pumpkin. An ice-cream scoop and a large metal ladle work
great to scrap the inside of the pumpkin to remove the guts. Utensils like the ones on the right are inexpensive
and can be found at most department stores in their kitchen section. We've picked some up
at our local dollar store for much less than other stores carry them.
Prepare
the Pumpkin for Carving
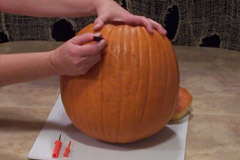
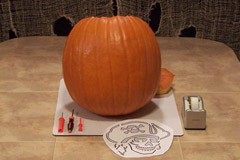 Inspect the surface of
the pumpkin to decide the best side to carve you face.
If the outside of the pumpkin is dirty,
just wash it off and dry with paper towel. Prepare the pumpkin by cutting out the top hole and gutting
the inside. The hole should be
large enough to allow you to scoop out the guts by hand and
with a large spoon. Generally, the size of the hole should be about two-thirds the
diameter of the pumpkin. You'll find that cutting a
five or six sided opening will work the best. As you cut out the top hole, angle the knife
so that the lid and hole will be somewhat cone shaped. This will help prevent the lid from
falling into the hole. Now you can use a large spoon to scrap the inside walls
of the pumpkin clean. Inspect the surface of
the pumpkin to decide the best side to carve you face.
If the outside of the pumpkin is dirty,
just wash it off and dry with paper towel. Prepare the pumpkin by cutting out the top hole and gutting
the inside. The hole should be
large enough to allow you to scoop out the guts by hand and
with a large spoon. Generally, the size of the hole should be about two-thirds the
diameter of the pumpkin. You'll find that cutting a
five or six sided opening will work the best. As you cut out the top hole, angle the knife
so that the lid and hole will be somewhat cone shaped. This will help prevent the lid from
falling into the hole. Now you can use a large spoon to scrap the inside walls
of the pumpkin clean.
Transfer
the Pumpkin Carving Design
 Select the paper stencil you want to use and trim the excess paper
around it with scissors. Be sure to leave at least a half to quarter
inch border
for the tape to go on. Attach the stencil to the face of the pumpkin
with tape. Top first, then the bottom and lastly the sides. Select the paper stencil you want to use and trim the excess paper
around it with scissors. Be sure to leave at least a half to quarter
inch border
for the tape to go on. Attach the stencil to the face of the pumpkin
with tape. Top first, then the bottom and lastly the sides.
You may
have to crease the stencil to tape the corners, if so, try to make
the creases where the pattern will be distorted the least.
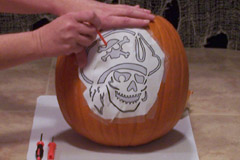
Using the Transfer Tool,
press the pointed tip into and through the design lines on the paper
pumpkin stencil spaced about
a 1/8 of an inch apart.
 The tip of the
Transfer Tool should be pushed in just enough to go through the paper and
the outer skin of the pumpkin, not all the way through the pumpkin. It's important that you take
your time when transferring the pattern from the stencil. Remember, you're making guide
lines that will be cut out of the pumpkin. Before removing the stencil, look it over carefully to make sure that
all the lines have been transferred clearly. Once the paper stencil is removed you'll see
the outline of the stencils pattern marked on the face of the pumpkin via little dots.
Once you remove the stencil be sure to save it in case you need to refer to it
while carving. The tip of the
Transfer Tool should be pushed in just enough to go through the paper and
the outer skin of the pumpkin, not all the way through the pumpkin. It's important that you take
your time when transferring the pattern from the stencil. Remember, you're making guide
lines that will be cut out of the pumpkin. Before removing the stencil, look it over carefully to make sure that
all the lines have been transferred clearly. Once the paper stencil is removed you'll see
the outline of the stencils pattern marked on the face of the pumpkin via little dots.
Once you remove the stencil be sure to save it in case you need to refer to it
while carving.
Cut Out the Pumpkin
Carving Design
 Using the Carving Saw,
push the tip of the saw-blade into a pattern hole and saw through the design lines with
short back-and-forth motions. Basically, you're playing "connect the dots". It's important to remember that these are
"saws", not knives. The saw is not used in the same way as a knife. You never
cut with it, you saw with it. Using the Carving Saw,
push the tip of the saw-blade into a pattern hole and saw through the design lines with
short back-and-forth motions. Basically, you're playing "connect the dots". It's important to remember that these are
"saws", not knives. The saw is not used in the same way as a knife. You never
cut with it, you saw with it.
Take your time and follow the pattern edges carefully. Always align the saw blade to
make the cuts straight into the pumpkin. When making sharp corners, remove the saw and
re-insert it at the new angle.
Cleaning Up the Pumpkin Carving Design
 Next, you need to remove all of the cut-out pieces. To
make removal of the pieces easier you can cut them into smaller section while still in the
pumpkin. Then carefully push out all of the cut pieces
with your finger or an un-sharpened pencil. Once you've removed all of the
cut pieces, carefully trim the inside edges of the pumpkin of any excess flesh with the
Carving Saw or a small knife. We like to carve the excess off at about a 45 degree angle.
This allows more light to come through, showing your design to it's fullest. Remove any cut pieces that have fallen inside the
pumpkin from your carving. Coat the edges with petroleum jelly. Next, you need to remove all of the cut-out pieces. To
make removal of the pieces easier you can cut them into smaller section while still in the
pumpkin. Then carefully push out all of the cut pieces
with your finger or an un-sharpened pencil. Once you've removed all of the
cut pieces, carefully trim the inside edges of the pumpkin of any excess flesh with the
Carving Saw or a small knife. We like to carve the excess off at about a 45 degree angle.
This allows more light to come through, showing your design to it's fullest. Remove any cut pieces that have fallen inside the
pumpkin from your carving. Coat the edges with petroleum jelly.
Finished
Pumpkin Design
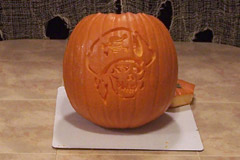
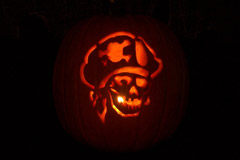 Your finished pumpkin should
look like the one on the right. The silhouette, in this case a spooky
skeleton pirate, should be clearly visible. We
place our pumpkin candles in clear glass candle holders so that they
last longer and are safer. Never leave a lit
candle, whether inside a pumpkin or not, unsupervised.
If you carve your pumpkins
on Halloween you shouldn't have a problem with the Jack O' Lantern
going bad. To extent the life of your Jack O' Lantern coat
the inside and all cut
surfaces with petroleum jelly immediately its been carved. This creates
a barrier to seal in the pumpkin's
moisture to slow down the dehydration of the pumpkin. Your finished pumpkin should
look like the one on the right. The silhouette, in this case a spooky
skeleton pirate, should be clearly visible. We
place our pumpkin candles in clear glass candle holders so that they
last longer and are safer. Never leave a lit
candle, whether inside a pumpkin or not, unsupervised.
If you carve your pumpkins
on Halloween you shouldn't have a problem with the Jack O' Lantern
going bad. To extent the life of your Jack O' Lantern coat
the inside and all cut
surfaces with petroleum jelly immediately its been carved. This creates
a barrier to seal in the pumpkin's
moisture to slow down the dehydration of the pumpkin.
Lighting Your Jack O' Lanterns
 Make sure that you have
scrapped the bottom of the pumpkin flat, so that the candle will sit level inside the pumpkin.
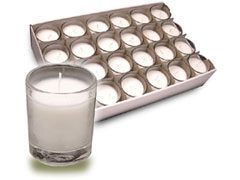
We prefer the traditional use of candles to illuminate our Jack-O'-Lanterns. A Votive
candle, placed inside of a clear glass candle holder like those shown to
the right are safer and will actually last longer because the wax
cannot drip away.
Also, plain white candles give off the most light and will illuminate the inside of your
Jack-O'-Lantern the best. While not as bright, battery powered lights are an alternative to lighting
your Jack-O-Lanterns,
particularly in cases where
a lit candle might not be safe. You'll find these a tea-light style
battery powered candles at most drug stores and mass retailers
during the Halloween season. Make sure that you have
scrapped the bottom of the pumpkin flat, so that the candle will sit level inside the pumpkin.
We prefer the traditional use of candles to illuminate our Jack-O'-Lanterns. A Votive
candle, placed inside of a clear glass candle holder like those shown to
the right are safer and will actually last longer because the wax
cannot drip away.
Also, plain white candles give off the most light and will illuminate the inside of your
Jack-O'-Lantern the best. While not as bright, battery powered lights are an alternative to lighting
your Jack-O-Lanterns,
particularly in cases where
a lit candle might not be safe. You'll find these a tea-light style
battery powered candles at most drug stores and mass retailers
during the Halloween season.
Photographing Your Jack O' Lanterns
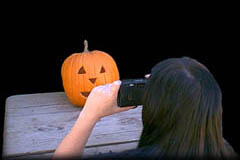 The light used
to illuminate the outside of the pumpkin and that of the candles inside is actually a
very delicate balance. Ideally, you will want to capture the glow of
the candles from
within the pumpkin, but still be able to see the carved outside of the pumpkin it's self. If you use a flash, you'll
over light the surface of the pumpkin and drown out the light from the candles inside.
First off, turn the flash on your camera off, you don't want it. To help avoid the light
inside the pumpkin from being to faint, we use two or even three candles. The light used
to illuminate the outside of the pumpkin and that of the candles inside is actually a
very delicate balance. Ideally, you will want to capture the glow of
the candles from
within the pumpkin, but still be able to see the carved outside of the pumpkin it's self. If you use a flash, you'll
over light the surface of the pumpkin and drown out the light from the candles inside.
First off, turn the flash on your camera off, you don't want it. To help avoid the light
inside the pumpkin from being to faint, we use two or even three candles.
The best technique is to take
your pictures around dusk, before it becomes totally dark. Be sure to use a fast film, ISO
400 or faster is best. Wait until dark, illuminate the
outside of the pumpkin with in-direct artificial light, i.e. a lamp and light the
candle inside the pumpkin. For more
information on pumpkin carving and Jack O' Lanterns
visit Pumpkin Carving 101
|
|