|
|
|
|
HOW TO TAKE GREAT
HALLOWEEN PHOTOGRAPHS |
|
from the New York Institute of
Photography
Halloween
Editor's Note
Since Halloween is a holiday that presents terrific photo possibilities, it's no surprise
that "How to Take Great Halloween Photographs" is one of our most popular
"How To" features. Because we've received so many requests to run it again,
we're happy to oblige. If you've never read this article, we promise you'll take better
photos of the goblins and ghouls that you meet on All Hallows Eve. If you have read it in
the past, why not review it as a brush up. After all, like Christmas, Halloween comes but
once a year! Boo!
|
October is a great month to take pictures. The humid hazy days of summer
have given way to crisp cool days with clear air and bright blue skies. The perfect
combination for sparkling photographs! The sun is lower in the sky, providing wonderful
long shadows in early morning and late afternoon. So conditions are perfect for
photographers - amateur or professional - to get out there and take great pictures.
October starts with the wonderful colors of fall and the harvest, and it
ends with a bang with Halloween - one of the year's greatest photo opportunities.
Let's cut to the Main Event - Halloween - and discuss how you can
make all types of dramatic and eerie photos. This is a great opportunity to use your
camera. Enjoy! |
©NYI Student John I.T.
Soper
E
E K ! |
|
|
Pope Gregory III started it all in 739 A.D. when he officially
designated All Saints Day, but he wouldn't recognize Halloween as we celebrate it today.
It's become a night of fantasy for children of all ages - a night of glowing
jack-o-lanterns, spooky costumes, and kids trick-or-treating. It's a night of spooks and
spirits.
 This year, it's not even
confined to just one evening. With Halloween falling on a Sunday, the festivities will
start with school events and parties earlier in the week, peak on All Hallows Eve. In some
parts of the world - for example, Mexico - November 1 is "Dia de los Muertes"
(Day of the Dead), a major holiday with both comic and solemn overtones to commemorate the
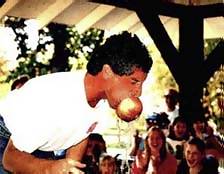
memory of departed ancestors. (In case you're wondering, the picture above is a
"typical" Day-of-the-Dead party favor. Some party. Some favor!)
This year, it's not even
confined to just one evening. With Halloween falling on a Sunday, the festivities will
start with school events and parties earlier in the week, peak on All Hallows Eve. In some
parts of the world - for example, Mexico - November 1 is "Dia de los Muertes"
(Day of the Dead), a major holiday with both comic and solemn overtones to commemorate the
memory of departed ancestors. (In case you're wondering, the picture above is a
"typical" Day-of-the-Dead party favor. Some party. Some favor!)
It's easy to turn Halloween fantasy into permanent photographic memories
if you keep just two things in mind: First, NYI's three Guidelines for Better Photographs.
Second, the "spirit" of Halloween.
Let's start with the NYI Guidelines. As with any picture you take
any time, good photographs depend upon your fulfilling NYI's Three Guidelines. Before you
press the shutter, you must decide on the answer to the three questions we call our Three
Guidelines: One - What is the subject of the photograph? Two: How can I focus
attention on that subject? Three: How can I simplify the subject? If you're
unfamiliar with these Guidelines, we suggest you first read our Photo of the Month Review
analysis for a demonstration of how these Guidelines work.
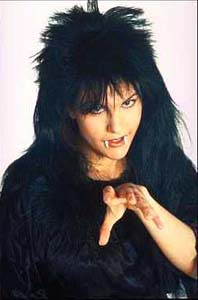 For
example, look at this picture of "Ms. Dracula." Here's a subject that can sink
her teeth into you! All Three Guidelines are clearly met. There's no doubt as to what the
photographer had in mind. Those fangs are clearly the subject here. They're right up front
and stand out loud and clear. There's nothing to distract you from the intent of this
picture. Ms. Dracula's eyes are staring right at you, and make it absolutely clear that
you - the viewer - are about to be lunchmeat! Ouch. For
example, look at this picture of "Ms. Dracula." Here's a subject that can sink
her teeth into you! All Three Guidelines are clearly met. There's no doubt as to what the
photographer had in mind. Those fangs are clearly the subject here. They're right up front
and stand out loud and clear. There's nothing to distract you from the intent of this
picture. Ms. Dracula's eyes are staring right at you, and make it absolutely clear that
you - the viewer - are about to be lunchmeat! Ouch.
But, as we've noted, the Three Guidelines are only part of the
story. The second key is to capture the "spirit" of Halloween. What's the
"spirit" of Halloween? Fantasy. Fear. The supernatural. The eerie. The
unworldly. And how can we capture this "spirit" in our pictures? The best way is
with the right dramatic lighting. Since nighttime ghouls are so central to the holiday,
this often means shooting at night or in dim light.
Hey, shooting at night? No problem, right? Just use a strobe,
right? Wrong! Halloween should look dark. Using strobe or flash will give you bright
lighting of scary creatures. Is that what you want? No. They look a lot more frightening
when you view them in the dim light of the crypt or the glow of the moon. Lighting? Yes.
Perhaps, "ghoul lighting." (We'll explain this in a moment.) Perhaps,
candlelight. But strobe? Usually, no!
We divide Halloween subjects into three basic groups, and each
calls for its own type of lighting: 1) Glowing Jack-O-Lanterns; 2) Kids and adults in
costumes; and 3) Kids out trick-or-treating. Let's look at each category separately.
Jack-O-Lanterns
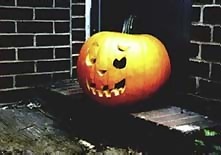
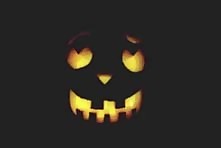
Here's one area where it's almost always better to
avoid the harsh, show-all light of strobe. Let's say you've just finished carving a scary,
snaggle-toothed jack-o-lantern. Let's take some pictures of it right away. |
|
©Chuck DeLaney - NYI Dean
|
©Chuck DeLaney - NYI Dean
|
|
|
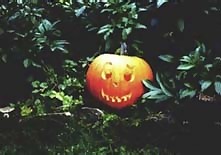
You can end up with a photo like the one on the left of the carved pumpkin
where you carved it - say, on the doorstep. Problem: The setting is apparent. And the
setting can distract from the subject. Better to place it somewhere that is less
distracting - for example, in the garden where the leaves can form a background for the
jack-o-lantern - as in the picture on the right.
Better,
but not perfect. Why? Because the real magic of the jack-o-lantern doesn't emerge until
it's dark and you've lit a candle inside to capture that ghoulish glow.
|
©Chuck DeLaney - NYI Dean
|
©Chuck DeLaney - NYI Dean
|
|
|
So you
wait until dark to shoot. Now, we have some new problems. If you don't override the
"automatic strobe" on your camera, your strobe will fire and you'll end up with
a picture like the one on the left, above. In this strobe light, you don't see much of the
inner glow of the candles, but you see every "complexion" defect on the
pumpkin's skin and a shiny highlight that screams "Strobe!" |
|
On the other hand, if you override the strobe and make sure it doesn't
fire, you end up with a picture like the one on the right, above - lots of candle glow,
but no sense of pumpkin! This isn't exactly right either!
What to do? How can you get a combination picture that shows the
glow of the candles, and also shows the pumpkin?
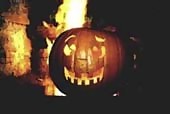
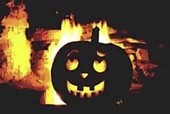
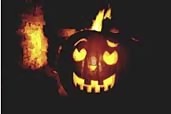
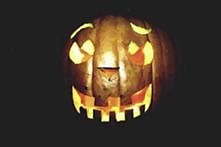
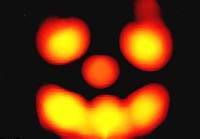
Call in the pyromaniacs. What we do is place the jack-o-lantern
in the fireplace and make a small fire from a few sheets of newspaper behind it. Result?
You get something like these:
How do
you get these different effects? By varying the lighting. (By the way, one thing is
constant. To get enough candlelight inside the pumpkin, we use three candles. Our
experience is that one or two are not enough!) The picture on the left is taken with just
the three candles inside the pumpkin and the fire behind. The picture in the center is lit
the same, but we've also added strobe. Personally, we think the flash is a little too
bright. So we shot the picture on the right using strobe again, only this time we put one
finger in front of the flash to cut down the amount of light that hits the subject. Which
of these pictures do you like best? It's a matter of choice. |
|
|
|
 Here's
another technique for low-light Halloween pictures. Take a tip from the pros. When they
want to show a scene at night, they often shoot before it's totally dark. They shoot
during twilight when the sky has that rich blue/purple color shortly after sunset. Like
them, you'll find that finished prints or slides make the scene look darker than it really
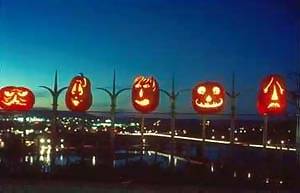
is so that the viewer will assume it was shot at night. Here's
another technique for low-light Halloween pictures. Take a tip from the pros. When they
want to show a scene at night, they often shoot before it's totally dark. They shoot
during twilight when the sky has that rich blue/purple color shortly after sunset. Like
them, you'll find that finished prints or slides make the scene look darker than it really
is so that the viewer will assume it was shot at night.
When you apply this technique, use fast film. Whether you use a
single lens reflex (SLR) or point-and-shoot, load your camera with a film that is ISO 400
or faster, such as Kodak's Gold Max or Fuji's Super G 800. You'll be thrilled
with the results. Try it!
Gremlins and Goblins and Ghouls
Everybody enjoys putting on a scary Halloween
costume and having fun. In fact, we were surprised to learn that in recent years, sales of
costumes for adults have outpaced costumes for kids! Whether you pose portraits of your
favorite poltergeist while he or she is getting ready to haunt the neighborhood, or you
"grab" candids of spooky partygoers or paraders, the steps are the same.
Let's say you want to take a portrait of your little boy (or kid
brother) in a "scary" costume before he goes out trick-or-treating. First,
figure out what's the best part of the costume. Is it just the mask on the face? Or is it
the mask and the torso too? Then get in close and fill the frame with the parts you've
decided are best. A pro tip: It's usually better if you don't shoot from head to toe since
shoes are often the weakest part of a costume. (One year we wanted to go to the local
Halloween parade disguised as a rabid raccoon, but we just couldn't locate the right
footwear.)
If you're shooting a child or a group of children, bend down low
to kid's-eye level. Don't shoot from adult level down on these little ghouls - you'll
trivialize them. Or if you're limber enough, bend down to below kid's-eye level or even
lie down for the shot. Nothing makes a monster more imposing than looking up at the scary
countenance.
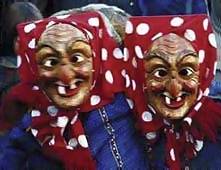
If you're shooting two monsters, get them as close together as
possible and, again, get close enough to fill the frame with the best parts of their
costumes. People tend to drift apart when there's a camera pointed at them. You want just
the opposite - no space between those monsters - like this:
 If
you can, make sure to take a photo of your favorite creature with and without the mask.
That way in future years everyone will be able to identify the little devil behind the
mask, and this year you may be able to use the picture for your Xmas card. If
you can, make sure to take a photo of your favorite creature with and without the mask.
That way in future years everyone will be able to identify the little devil behind the
mask, and this year you may be able to use the picture for your Xmas card.
The same tips go for portraits of adults in costume, only you
don't have to get down so low to be at eye-level.
But don't forget
the possibility of bending low or even lying down to make the monster look taller and
scarier. |
|
When you
turn to groups of monsters, aim for the two elements that help any group photograph.
First, show relationship by having them close together, touching one another wherever
possible - you know, arm over the shoulder, etc. Second, make it casual. Try to get them
to laugh and relax.
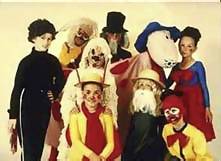 With groups of monsters - young or old - it's the same. First,
pack them together, have them touch, and fill the frame with them. Second, keep it casual.
Don't line them up like soldiers at attention. If you're photographing three, group them
in a triangle - this arrangement usually looks best. In a larger group, like the one shown
above, have some kneel or crouch down in front of the others so you get an up-and-down
arrangement. Regardless of the grouping, before you shoot get them to give their scariest
growls and grunts and moans. In this case, it beats laughing! With groups of monsters - young or old - it's the same. First,
pack them together, have them touch, and fill the frame with them. Second, keep it casual.
Don't line them up like soldiers at attention. If you're photographing three, group them
in a triangle - this arrangement usually looks best. In a larger group, like the one shown
above, have some kneel or crouch down in front of the others so you get an up-and-down
arrangement. Regardless of the grouping, before you shoot get them to give their scariest
growls and grunts and moans. In this case, it beats laughing!
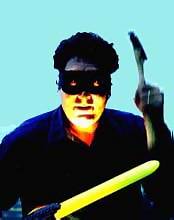
Now, how should we light these posed creatures? When possible,
try "ghoul lighting." We mentioned "ghoul lighting" before. What is
it? Remember how, as kids, we would shine a flashlight up at our face from below the chin.
This is "ghoul lighting." It's different from our everyday lighting which is
almost always from overhead, whether it comes from the sun or from room lights. Ghoul
lighting creates shadows on the face that are eerie, other-worldly, exotic - in a word,
"ghoulish." If you're taking a close-up of a face, here's what we suggest: Don't
use your strobe. Rather, have the vampire hold a flashlight about six inches under his
chin and point the light up onto his face. Then just bare a few fangs, and Eek!
©NYI Student Quinn Hancock
 Candid pictures at
parties and parades use pretty much the same techniques. While you may have to react
faster, the secret is to decide on the best part of the costume before you shoot,
then get in close enough to fill the frame with this part. Candid pictures at
parties and parades use pretty much the same techniques. While you may have to react
faster, the secret is to decide on the best part of the costume before you shoot,
then get in close enough to fill the frame with this part.
Chances
are, you'll have to use strobe to get enough light, but often you'll get a better-lit
picture if you just use available light. Of course, if you plan to use available light,
once again we suggest you use a fast film - ISO 400 or faster.
 Trick-or-Treat Trick-or-Treat
We really have two different
types of situations here. First, pictures you take from inside your house of goblins who
come trick-or-treating to your door. Second, pictures you take from outside a neighbor's
door when you follow around after your own baby goblin. We made the portrait of this scary
trick-or-treater using the ghoul lighting technique that we described above.
When you're taking pictures of monsters coming to trick-or-treat
at your door, you have to be ready. Kids come and go mighty fast. Here's one time when
flash on camera can come in handy.
It's best if you have two people in the house. One to answer the
door. The other to take the picture from behind so that the photo includes both the person
answering the door and that porchful of ghastly visitors. Tell the ghouls they'll have to
grimace and groan before treats are dispersed - then snap the shutter while they're
howling.
If you are following your own kids with your camera on their
trick-or-treat rounds, try to capture their expressions of glee when candy is poured into
their outstretched hands. As always, get in close. And - very important - position
yourself so that the door won't swing open and block your view.
 In
sum, the key to great Halloween photos boils down to following the three NYI Guidelines
and capturing the spirit of the occasion - ghoulish celebration and silliness. So, for all
types of great Halloween pictures, know what you want the subject of each of your pictures
to be, and make it important in the frame usually by making it big and up front in the
frame. Then add the "mood" that captures the spirit of Halloween by the ghoulish
way you light your pictures and/or the silly way you pose your subjects. If you apply
these simple ideas, you're going to make this a Halloween you'll never forget! In
sum, the key to great Halloween photos boils down to following the three NYI Guidelines
and capturing the spirit of the occasion - ghoulish celebration and silliness. So, for all
types of great Halloween pictures, know what you want the subject of each of your pictures
to be, and make it important in the frame usually by making it big and up front in the
frame. Then add the "mood" that captures the spirit of Halloween by the ghoulish
way you light your pictures and/or the silly way you pose your subjects. If you apply
these simple ideas, you're going to make this a Halloween you'll never forget! |
Special Thanks to the:
New York Institute of
Photography
211 East 43rd Street, Dept. WWW
New York, NY 10017 U.S.A.
nyi@soho.ios.com
Reprinted with permission from the New York Institute of
Photography Copyright © 1999
|
|